Tag Archives: grow taller

Grow Taller Through Cartilage Replacement and Growth

So this will be the first method that I have personally have thought of by myself. The technique is very advanced and I don’t know if any surgeon or orthopedic medical profession would ever suggest something but I will make this proposal.

We all know that the long bones in the body stop growing after a certain age. I would assume that 95% of the people who desire to grow taller have already reached the age when the bones have already fused and the epiphyseal plates are ossified. I mean, why would we have such a deep desire and almost desperation to become taller if we were still in the process of growing? (Right?) There is a very well known saying that people don’t often appreciate what they have until they lose it.

If we study the biggest long bones in the human body like the femur, humerus,tibia, fibula, , radis, ulna, we should try to find exactly where the epiphyseal line is located which is where the growth plates actually sealed at.

I wanted to only focus on two sets of bones in this post, the femur and the humerus. The femur is the bone that forms the infrastructure of our upper leg. The humerus represents the core of our upper arms.

If we look at the diagram of the femur above, we notice that the epiphyseal plates are  not at the same distance as where the core of the bones is, which is the marrow cavity. This means that it is possible then to surgically open the long bone, cut at exactly where the fused plate is, and add a thick slab of cartilage between the surgically separated parts. As we all know, the bone can heal itself, so if we can compress the cartilage between two bones, eventually the 3 parts should fuse together. After the parts are fused and before the body begins to ossify the cartilage again , we can inject a high level of HGH into the body and give it the needed growth hormone to allow for increased bone lengthening.

Since there are a pair of femur and another pair of humerus making up 4 long bones, theoretically there could be 8 places (because there are 2 epiphyseal lines on each end of each long bone) that we can add regrown cartilage into.

Right now, this theory I proposed is probably impossible to actually test because of the amount of surgical work that must go into it. A person would have to be willing to become a quadraplegic at least temporarily just to even test this theory. Their limbs are literally removed and reattached. More than that, before the surgeon can even reach bone, they would have to somehow also cut through the muscle which is ridiculous to imagine. I have never seen amputation done and I would assume that after amputation, there may be no way to reattach or connect the cut muscle to heal/ fuse together, let alone the bone.

Another big concern is where would we even get the right type of cartilage for the patients. It is well known by medical professionals that our body will reject body parts if they don’t agree with our immune system. That is why when a person gets into an accident and are escorted to the hospital or emergency room, their blood type is immediately found so that a person with the correct blood type can give them blood. This is also true for body organs, bone marrow, and other body parts. Historical, the medical literature has shown that cartilage unlike other body parts is not able to regenerate or grow. That has only recently been proven not to be true. Any cartilage that are grown in the laboratory with the most modern technology is intended to be implanted into the knee or hip for people of old age who suffer from osteoporosis and have lost of the cartilage in their joints.

So in conclusion, this theory of mine could theoretically be a viable option, but there are some giant hurdles to get past. They are

1. Finding willing participants and patients who will go through with the experimentation.

2. Learning how to cut through the muscle and then reconnecting the muscles after

3. Figuring out how to connect the cartilage and separated bone to fuse together.

4. Regrowing enough Cartilage for Implantation

5. Having the right type of cartilage for the individual being operated on.

6. Making sure that adding HGH will be effective in getting the cartilage to work like a growth plate.

 

Grow Taller Using Yoga , Part II

This will be a really short post where I will refer you to a site which will show you and maybe also teach you certain types of stretching exercises and poses (asanas) which will help you stretch out your back and neck and make them more flexible. A more flexible neck and back means that it can be stretching so your height should theoretically increase by some amount.

All the exercises and poses shown below are mainly to stretch the back and neck, and also increase their flexibility.

Personally, I have always been a fan of yoga, ever since learning about it when I was only 15 years old. I practiced Kriya Yoga for only 1 year but got into reading more about the esoteric and mystical teachings later on.

NOTE: This is an important disclaimer on my end. I do not own, create, or sell the information of all the type of Yoga Asanas at the bottom of the post which I found at kundaliniyoga.com for any form of profit. I am only distributing this information for other people so that they can be more informed and knowledgeable. I only try to give great value to others who are searching for a path towards their height increase goals. If anyone here feels that what I have done is against any laws or violates some legal issue, I will promptly remove what is listed. 

You can find the resource link at www.kundaliniyoga.org/spinal.html or by clicking HERE.


Exercise Set for
Maintaining a Flexible Spine

We offer you here, an exercise set to introduce you to Kundalini Yoga (KY). One of the most important factors in maintaining a healthy body is a flexible spine. The yogis say that youth is determined by the flexibility of your spine.

Low back pain and upper back stress are some of the most common health complaints of adults. The best way to avoid backaches is to take care of your spine on a daily basis. There are no quick fixes for back pain, but this exercise set is an effective maintenance program.

To Begin
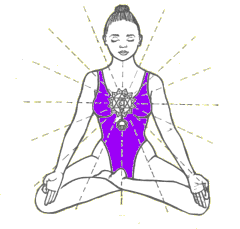
Sit quietly and be with your breath. Consciously slow down the breath and breathe from the belly. Be with the sensations in your body. Tune into your own rhythm. Allow a few minutes to calm down, center yourself and create your own space.

Tuning in
Before beginning Kundalini Yoga practice, always “tune in” by chanting the ADI MANTRAClick here for full details

Exercises

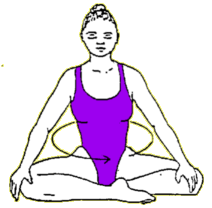
Pelvis Rotations Rotate the Pelvis
Sit in easy pose. Place the hands on the knees. Deeply roll the pelvis around in a grinding motion. Relax into the movement. Make it a moving meditation.Do 26 rotations or 1-2 minutes in each direction.Benefits: This exercise opens up the energy in the lower spine, massages the internal organs and aids in digestion.
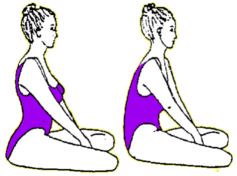
Spinal Flex
Sit in easy pose. Grab the ankles. As you inhale powerfully, flex the spine forward, keeping the shoulders relaxed and the head straight. Do not move the head up and down. Exhale and relax the spine back. Continue rhythmically with deep breaths. As you inhale feel the energy go down the spine. As you exhale feel it come back up to the third eye. Mentally bring SAT down and NAM back upthe spine.1-3 minutes or up to 108 times.

Spinal Flex

To end: Inhale deep, hold the breath, apply rootlock (mulbhand), exhale and relax. Sit quietly and feel the energy circulate in your spine and throughout your body.Benefits: This exercise stimulates and stretches the lower spine.
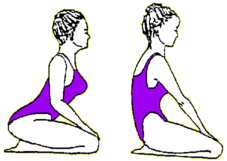
Spinal Flex on Heels Spinal Flex On Heels
Sit on the heels; place the hands flat on the thighs. Continue spinal flex as above with a powerful breath.1-2 minutes.Benefits: This exercise works on the mid spine and heart chakra
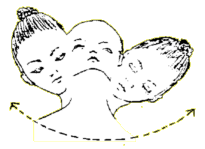
Neck Rolls
Sit with a straight but relaxed spine. Adjust the head so that you feel like it is sitting on top of the spine by slightly moving the head back and bringing the chin down slightly. Roll the neck slowly in one direction and then in the other. Let the weight of the head move the head around. Do this very methodically so that you go slowing through tight spots and work out areas of tension.

Neck Roll

At least one minute in each direction.To end: After this exercise, sit quietly and be with the sensations in your body and spine.Benefits: This exercise removes tension in the neck and stimulates the thyroid.
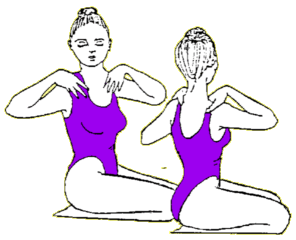
Side Twists
Side Twists

Sit on the heels. Place the hands on the shoulders, fingers in front and thumbs in back. Inhale, twist to the left. Exhale, twist to the right. Twist your head to each side as well. Gradually feel an increased rotation in your spine. Keep elbows parallel to the ground, allowing the arms to swing freely with the body. This exercise can be done standing up,Continue 1-2 minutes or 26 times.To end: Inhale center, hold the breath, apply rootlock, exhale, relax and feel the energy circulate, especially at the level of the heart.Benefits: This exercise opens up the heart center and stimulates the upper spine.
Side Bends
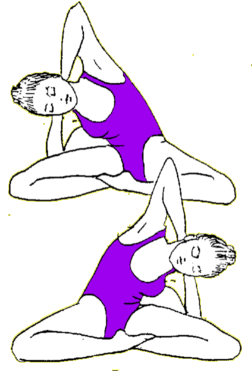
In Easy Pose, clasp hands behind neck in Venus Lock (fingers interlaced) and bend straight sideways at the waist, aiming the elbow toward the floor beside the hip. Inhale as you bend left, exhale right. Don’t arch or contract the back. Bend sideways only. This exercise can be done standing.1-2 minutes or 26 times.Benefits: Side bends stimulate the liver and colon and increase spinal flexibility.

Side Bends

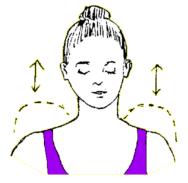
Shoulder Shrugs Shoulder Shrugs
Still on the heels or in easy pose, shrug both shoulders up on the inhale and down on the exhale.1- 2 minutes.To End: Inhale up, hold, apply rootlock, and relax.Benefits: This exercise loosens up the tension in the shoulders and relaxes upper back

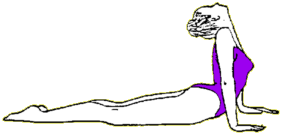
Cobra

Lie on the floor with the palms on the floor under the shoulders. As you inhale, slowly arch the spine up, leading with the nose, then chin, then pushing off with your hands vertebra by vertebra, until you are arched back as far as possible with no strain in the lower back, concentrating on a. good stretch from the heart center up. Breathe long and deep or do Breath of Fire.2-3 minutes

To end: Inhale, hold, pull the energy up the spine with the root lock. Exhale very slowly and come down one vertebra at a time. Relax. 1-3 minutes.

Cobra

Benefits: This exercise strengthens the lower back. Removes tension in the back and balances the flow of sexual energy with navel energy.
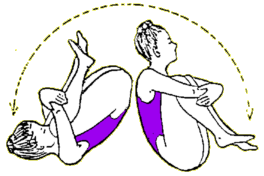
Rock and Roll on the Spine
Bring your knees to your chest, grab them with the arms, and rock back and forth on the spine, massaging it gently from the neck to the base of the spine. Make sure you have a soft surface.1-2 minutes.Benefits: This exercise circulates the energy and relaxes the spine.

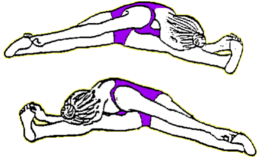
Alternate Leg Stretches
Spread the legs wide apart, grasping the toes or any other place on the legs where it is possible to keep the knees straight. Inhale center and exhale down to the left leg, inhale center and exhale down to the right leg. Move from the hips to open the pelvis. Avoid simply bending and arching the upper spine. Keep the spine comfortably straight and get a good stretch in the back. Loosen up the muscles, but do not strain them. Continue with powerful breathing. 1-2 minutes.
To end: Inhale center, hold the breath, apply root lock and then relax. Bring the legs together and bounce them up and down a few times to relax the muscles and massage them.

Benefits: Opens up the pelvis and stretches the leg muscles.

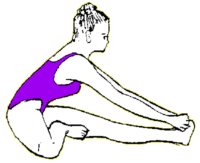
 Life Nerve Stretch
Legs outstretched, bring right foot into left thigh, and slowly bend over the left leg to grab the foot or ankle (or wherever it is comfortable), keeping the leg flat on the ground. Breathe long and deep or do Breath of Fire. 1-2 minutes each side.To end: Inhale deeply and exhale several times deepening the stretch. Then slowly come up. Bounce the legs and massage them. Switch sides and repeat.Benefits: This exercise stretches the leg muscles and loosens up the lower back.
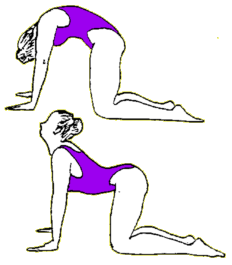
Cat Cow
Come on the hands and knees, knees shoulder width apart. Inhale as you flex your spine down and bring your head up. Exhale as you flex your spine up in an arched position with the head down. Keep the arms straight. Continue rhythmically with powerful breathing, gradually increasing the speed as your spine becomes more and more flexible.1-3 minutes.To end: Inhale in saggy cow, hold, pull the energy up the spine with the root lock. Exhale and relax on the heels. Sit quietly and let the breath slow down. Feel the energy circulate. Concentrate at the third eye.Benefits: This exercise is known as the Kundalini chiropractor. Done regularly it loosens up and adjusts the spine.
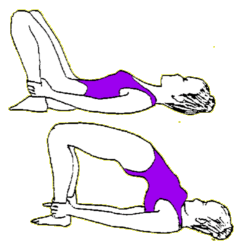
Pick Me Up
Pick Me Up Exercise

Lie down on your back and simply relax for a moment. Then bend your knees and draw the heels up towards the buttocks, keeping the feet flat on the floor. Grab your ankles and holding on to them, slowly raise the hips up, arching the lower spine and lifting the navel towards the sky. As you lift up, slowly inhale through the nose. Hold the breath as you gently stretch up, lifting as high as is comfortable, then slowly relax down again as you breathe out through the nose.Slowly repeat this lifting up and down movement a minimum of twelve times, synchronizing the breathing with the movement of the hips, for a maximum of 26 lifts. To go from the minimum number of 12, to the maximum number 26, increase your total. 1-2 lifts per day.
To end: Inhale up, hold the breath for ten seconds, pull in the navel and apply the root lock. Then relax down, stretching the legs out. Totally relax and feel the energizing effect of the exercise.Exercise Tips: If you can’t grab your ankles, let the arms be at your side and lift up using the arms to help push you up. People with any history of lower back pain should check with their doctor before beginning. Try to let your breathing do the work–inhale the hips up and exhale them down. This exercise will automatically get you to breathe deeply. Keep the eyes closed throughout this and other exercises so that you can feel your body move rhythmically, without visual distractions. Rest on your back for two minutes after the exercise and just enjoy its vitalizing effect!Benefits: This exercise releases abdominal stress! It gives you an immediate boost of energy throughout your body that lasts well into the day. It also stimulates your thyroid. It allows you to breathe deeper and adds to your energy level. It moves the energy from the lower spine to the upper spine.

Relaxation
Deeply relax your back, hands to the side, palms facing up. Simply be with the sensations in your body and enjoy the feelings.

Meditation
Sit quietly and meditate. Be present to the sensations in your body. Increase your awareness to include every part of your body and spine. Consolidate your presence by feeling all your sensations simultaneously for at least one minute at the end.2-5 minutes or as long as you like.To end: Inhale and exhale deeply 3 times. Raise your arms above your head, stretch your spine, shake your arms and send blessings to the world. Carry this feeling of blessings and gratitude with you throughout your day.
Meditation

When to Practice Benefits

This series of exercises works systematically from the base of the spine to the top. All 26 vertebrae receive stimulation and all the energy centers receive a burst of energy. These exercises increase the circulation of the spinal fluid, which contributes to greater mental clarity. Regular practice of this series will give you increased vitality, help prevent backaches, reduce tension, and keep you young by increasing the flexibility of the spine.

This set can be done in the morning as a way to give you added energy for the day. It can also be done in the evening before dinner to revitalize you after a busy day and give you energy for the evening.

Breathing and Mantra
The powerful effects of the Kundalini exercises are attained by combining movement, breath and mantra. In Kundalini yoga we either coordinate a powerful inhale and exhale with the movement or do long deep breathing or breath of fire, with poses that are held. All breathing during the exercises, both the inhale and the exhale, is done only through the nose with the mouth closed, unless otherwise specified.

The use of a mantra, chanted internally helps to focus the mind and clean the subconscious mind. The mantra that we use is Sat Nam. During the exercises, mentally chant Sat on the inhale and Nam on the exhale.

(see also Fundamentals of Kundalini Yoga – on this site)

Your Own Pace
Begin and continue your practice at your own pace. There is no contest to see what difficult poses you can get into. The goal is to activate your glandular system and strengthen your nervous system so that have more energy and feel more alive. Go to your limit but not beyond. Only you know your own body and what works for you. Possible touchstones include activation, gentle stretch and rhythmic movement.

Between Exercises
Take 30 seconds or more to relax between exercises and be with the energy as you experience it in your body. The energy will automatically adjust and go to where it is needed. Your job is to be present, and not consciously try to make something happen. If you do the exercises, something is already happening. One of the wonderful things about Kundalini Yoga is the discovery. Allow yourself time to discover that is taking place.


ADDITIONAL COMPONENTS
Once you have mastered the Set as above, try adding the following more advanced components, inserted in the above program between Neck Rolls and Side Twist. Follow instructions carefully. If in doubt, ask for advice on theKundalini Yoga list.


Shoulder Stand & Plow
(Make sure that your neck is protected with a soft surface).

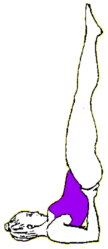
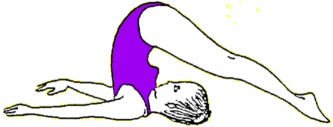
On the back, raise legs and torso above the head, supporting the body with the hands at the waist and extending the legs and hips into a straight line, with long, deep breathing for 1 to 2 minutes. Then drop the feet back over head into Plow Pose, resting arms on the ground. Rest there a minute before slowly lowering hips onto floor, vertebra by vertebra.


Shoulder Stand & Plow

This exercise bends and stretches the entire spine, especially the neck and thoracic vertebrae. It stimulates the thyroid and the throat chakra, and relaxes and energizes the spine.

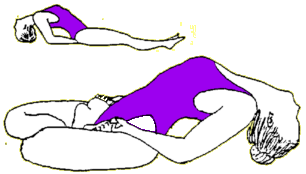
Fish Pose

Sit in Lotus Pose, or with legs outstretched, and lie back on the elbows, arching up the sternum, with the weight on the top of the head and the hips. Grab big toes with opposite fingers and do Breath of Fire or long deep breathing for 1 to 2 minutes. (With legs stretched out in front, rest on hips, elbows and top of head.)Fish Pose is the counter-pose for Plow and Shoulder Stand. It prevents or corrects rounded shoulders and jutting neck. It also stimulates the thyroid and the throat chakra.